

Utah Women’s Networking Group Online Membership Directory
This how-to guide is provided to our members to assist in the setup of their business listing profiles on our website. For members who wish to be in the directory without listing a business, they can just use their own name and contact information instead. Please read and follow the steps in the guide before sending questions or requesting assistance.
Most members will automatically claim their business listing during the setup of a new listing, but administrators can create listings and allow members to claim later if needed. Claiming a listing allows you to make edits and changes to it later. The listing will appear in the directory while membership is current. Memberships that lapse will result in listings being removed from the directory. Please be sure to act on notification messages for renewals in a timely manner.
Please contact webadmin@utwng.com or an ambassador if you have any questions.
You are responsible for keeping your listing up to date and making any changes to contact details as needed. Different levels of membership will control what you are allowed to list. Full Business members can upload a logo and a set of images to better feature themselves or their businesses. Be sure to optimize your images for web viewing (570 x 380 pixels is best) so they will look good in the directory previews. You can see the Example Full Listing for example images that work well in the directory.
Membership Levels
We maintain a directory of current members for the benefit of our community and to provide opportunities to support and promote each other and our businesses. This guide will walk you through the steps of registering your user profile and business listing on our website. We will we rely on our members to add specific details and enhance their profiles with logos, business images, hours of operation, website and social media links, and special member to member offers.
Membership levels will include the following directory features (see Membership Packages page for other benefits):
Community Member – Basic listing with Business Name, Member Name, 1 business category, limited keyword tags, one image (we recommend a good headshot so you are recognizable at networking events). Also includes read only access to the separate Utah WNG Business Resources Facebook Page.
Resource Member – This level will be phased out and pricing has been increased for new members to match the cost of the business membership. Please choose either Community or Business Member options. Grandfathered benefits for previous Resource members were: Same options as Community with the addition of a linked business listing option, short business description and more keywords, and the ability to list a contact email. Also included posting privileges on the separate Utah WNG Business Resources Page.
Business Member – List up to 5 different business categories, full keyword tagging, up to 10 images, links to business hours, website, email, social media links, special offer fields, ability to link up to 3 other business listings at no extra cost. Includes moderated Facebook posting priviledges to promote business info to members and list business events on our member event calendar.
Get Started
To become a WNG member, start by filling out our application form This piece is used to approve members for our closed Facebook group. Our existing Facebook group members have already done these steps. Before engaging on the Women’s Networking Group Facebook Main Page or WNG Business Resources Page, please read our Posting Do’s and Don’ts Page In order to post any content to the Facebook group, you will also need to submit the WNG Posting Agreement Once these steps are completed, we will give you access to Facebook.
If you wish to purchase a membership, but do not plan to use the website business listing directory, please contact us and we will give you a link to purchase the membership separately. You will still receive all of the other benefits of membership and Facebook participation.
For those who plan to use the website, please follow these next few sections.
First you need to register as a user on our site. First time users will see a Register option from the top menu.
To purchase your membership and create your business listing, you need to visit the website and log in to your WordPress account with the username and password you created. You can Log In from the top menu.
Directory Setup Step 1: Pick Your Membership Level
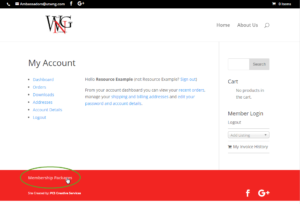
Once you are logged in, you will see this screen. Look at the bottom for the link titled “Membership Packages” and click it to see what the membership levels and costs are. Click the Add Listing button at the bottom of one of the packages.
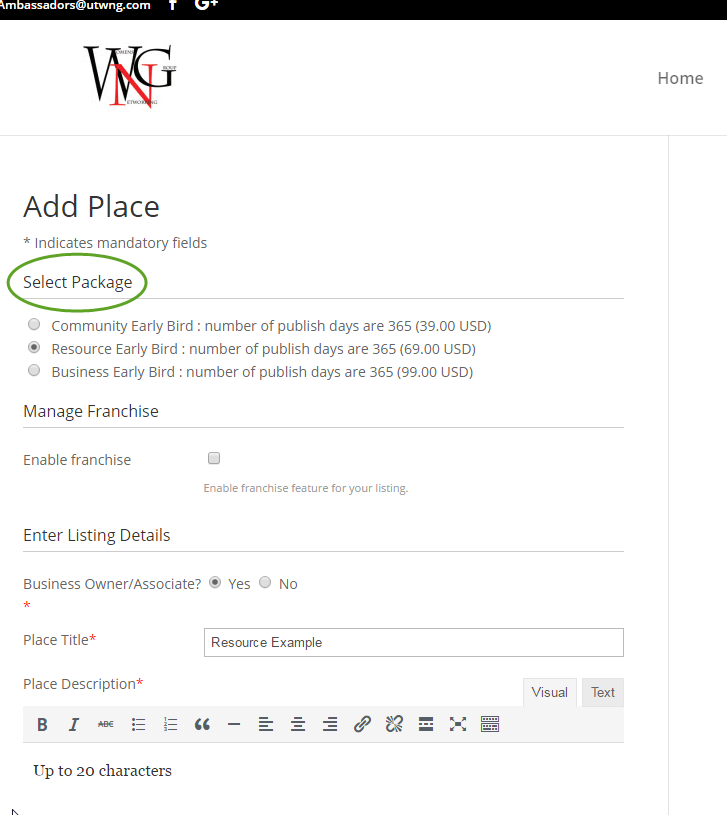
Step 2: Pick Your Membership Package and Add Business Info
The type of membership package you select will determine which options you can fill in. You will pick your package, fill in the fields allowed, review and confirm your listing, then pick your payment method and process your payment. Community Level includes Business Name and Member Name fields, Do not pick the Resource Level membership. This is being phased out and existing members will have their package updated in the future. This costs the same as the Business Membership, so pick that instead for full listing options.
Directory listings are intended to show a business name, but each member should also put their first and last name under Member Name. If you do not have a business, just list your own name as the “place.”
The “Manage Franchise” feature is not just for Franchises. It lets a business owner create and connect other “my businesses” listings to a membership. Business level members can add up to 3 more listings at no added cost. Click the checkbox to enable this feature, added costs for Community members may apply at checkout.
To claim the Listing and own it, select “Yes” by Business Owner/Associate. When you select “yes” here, it gives the user account currently logged in, the right to edit the listing in the future. Only one user can edit a claimed listing. If you need to change the person who manages your listing, contact webadmin@utwng.com for assistance.
Tag Keywords are descriptive words to help you identify specialties and business subcategories. Separate each with a comma. Please note there are character limits for these at each membership level. Exceeding the character limit will prevent your tags from showing up correctly.
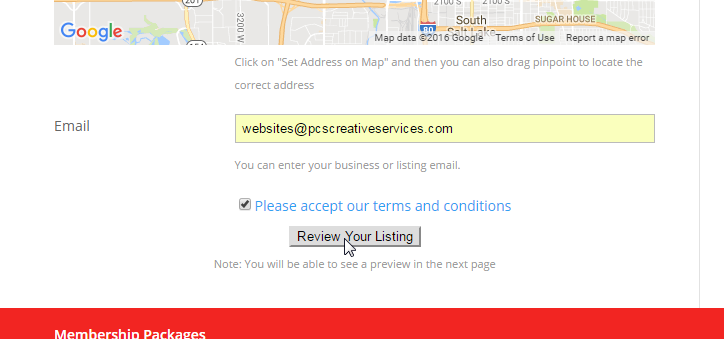
Click the check box to accept our terms and conditions (if you click the link to review these first, we recommend you right click and select “Open Link in New Tab”).
Then click the “Review Your Listing” button to proceed to the checkout process.
There are several additional options available at the Business level of membership. These include: Time (business hours), Phone, Email, Website, Twitter, Facebook, Youtube, and Special Offers.
Business level can also add up to 10 images (recommend 570 x 380 pixels). We recommend that you gather together your links and images in advance to make this setup process go more smoothly.
Step 3: Checkout and Pay for Listing
New listings will still need to be approved before they will appear, but you must complete the checkout process first. (If you start your listing but don’t finish paying online, a draft with your details can be saved, but this may delay the process quite a bit.) If the listing package cost and details are correct, click the “Confirm Preview & Go to Checkout” button.
Select your payment processing method and continue through the payment screens. Please give us 48/72 business hours to approve new listings.
Confirmation
You should see a screen confirming “Listing Posted Successfully.” From here you can click a link to “View your submitted information” or click a link to “Logout” (below the My Dashboard section). For now, we are reviewing all listings before they are published. It may take a few hours (depending on when you complete), before your listing appears in the Member Directory.
You will receive a renewal notification message 2 days before your membership is due for renewal next year. Please keep your email address updated on the site so you don’t miss these notices. With any changes on the site, you should login to your user account before you try to renew or update information.
Thank you for being a part of the Utah Women’s Networking Group. We appreciate your support!
Updating your Listing
Now that you are a member, you may want or need to change information in your membership listing. Not a problem! Here are the simple steps you can follow to update your listing:
- Click Log In from the menu above to login to your account.
- Enter your username and password. Your username is your email address. If you forgot your password, please click the “Forgot Password?” link and follow the steps to reset your password.
- Once logged in, click on “Membership Directory” then search for your company name.
- Once your listing comes up, click on your listing then look for the “Edit this Post” link on the right hand side. From there you can update/add to your information.
- Once your updates are complete, scroll to the bottom of the page and check the “Please accept our terms and conditions” box and then click the “Review your listing” button.
- You will then preview your listing and if it is all good, click the “Update Now” button at the top right. Then you are all set!
If you have any questions about this process, please send an email to webadmin@utwng.com .